BTW if you need to uninstall ASSP click here .

What is ASSP ?
The Anti-Spam SMTP Proxy (ASSP) Server is an antispam SMTP Proxy server which implements auto-whitelists, self learning Hidden-Markov-Model and/or Bayesian, Greylisting, DNSBL, DNSWL, URIBL, SPF, SRS, Backscatter, Virus scanning, attachment blocking, Senderbase and multiple other filter methods. ASSP can be controlled using an ASSP Web interface (GUI).
What is ASSP Deluxe for cPanel ?
"ASSP Deluxe for cPanel" is an ASSP frontend/integration for cPanel ; it's a set of PHP scripts which allow to install, configure, run and monitor ASSP in a cPanel server. ASSP Deluxe for cPanel includes an ASSP WHM interface, spambox IMAP for each email user, email queue finder, spam outgoing notifications, clamAV unofficial signatures support, Pyzor plugin for ASSP, automatic updates, Daily blocked email report, a cPanel ASSP frontend for users, ASSP SSL SNI and ASSP MySQL or BerkeleyDB automatic setup, ASSP Perl module automatic installation and other features.
Following HOW TO installs ASSP V. 2.x
- Hardware requirements : You can install ASSP 2.x in any cPanel server with min. 4 GB RAM (recommended 6GB) and min. 2 CPU cores .
Time required to complete ASSP v2 installation 45~60 minutes.
Open cPanel WHM  Service Configuration Service Manager and Disable/turn OFF SpamAssassin by unchecking SpamAssassin as shown below
Now go up in the page and be sure RecentAuthedMailIpTracker ( or the obsolete antirelayd cPanel service ) service is enabled as shown below


Open cPanel WHM
Server Configuration
Tweak Settings , click the Mail tab and uncheck (disable) SpamAssassin and boxtrapper as shown below.
Open cPanel WHM
Service Configuration
EXIM configuration manager ,
click the Reset tab and select "Reset the entire EXIM configuration to the default settings provided with cPanel & WHM", select
"Disable third-party and custom ACLs" and click "Reset" as shown below. 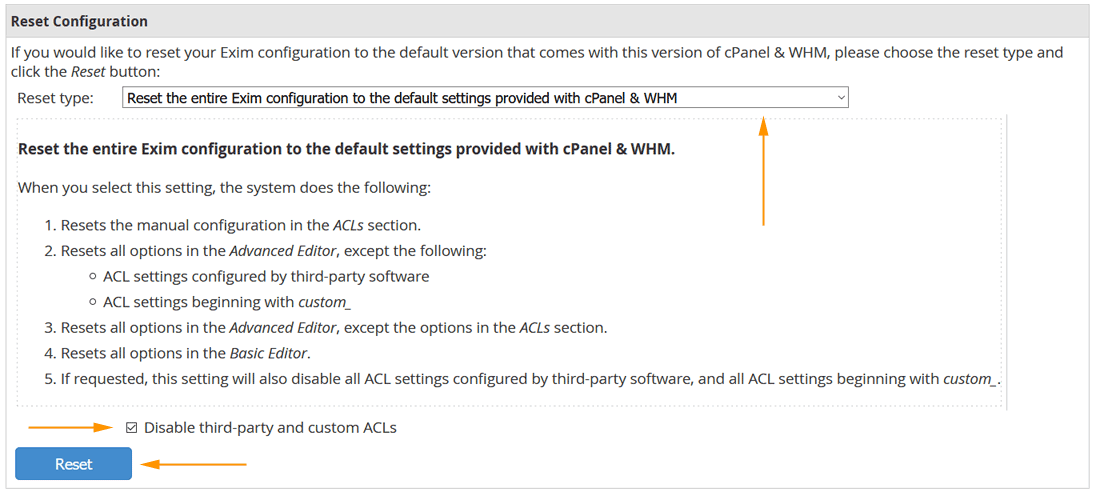
Now open again cPanel WHM
Service Configuration
EXIM configuration manager, and set OFF all EXIM Access Control Lists (ACLs) .In few words you should set OFF almost everything except of Validate Sender and set as optional not ACL settings, more exactly Domain and Ips settings and Security settings are optional . If you are using a customized System Filter File (Filter section) you can use it . If you still have any doubts you can see the video below (created using WHM 86) which shows you how to reset EXIM and how to disable EXIM ACLs.
Why all EXIM ACLs settings should be set OFF in EXIM Configuration Manager ?
Simply because we want avoid antispam redundancy while running ASSP. For example we turn OFF RBL checks in EXIM because these checks are already executed by ASSP ( ASSP checks the email before EXIM ) there is no reason to do this twice.
Open cPanel WHM cPanel Manage Plugins and install ClamAV as shown below
Only if you have CSF firewall installed go to cPanel WHM Plugins ConfigServer Security & Firewall and click Firewall Configuration.
Adds ,125,25,26,587,55553,55555,2703 to TCP_IN =
Adds ,25,26,587,55553,55555,2703 to TCP_OUT =
Adds ,6277,24441 to UDP_IN =
Adds ,6277,24441 to UDP_OUT =
Set DENY_IP_LIMIT = to 2000
Save Settings in CSF firewall and restart it.

Ok... WHM cPanel is configured to install ASSP. Now we can start the installation.
Now execute following commands to install ASSP Deluxe and ASSP WHM files
# wget -O /root/installer.php http://www.grscripts.com/install/installer.deluxe
# /usr/local/cpanel/3rdparty/bin/php-cgi /root/installer.php;rm -f /root/installer.php
Once completed the commands above you can install Perl. ASSP 2.x requires a linux-thread-multi Perl and latest recommended Perl for ASSP v2 is 5.30.0 ; it will be installed in /usr/local/perls . You can remove this custom Perl (/usr/local/perls) if you'll decide to uninstall ASSP. Execute following commands to install Perl 5.30.0 in /usr/local/perls now
# cd /usr/local/perls;wget http://www.cpan.org/src/5.0/perl-5.30.0.tar.gz
# tar -xzf perl-5.30.0.tar.gz;cd perl-5.30.0
# ./Configure -des -Dusethreads -Dprefix=/usr/local/perls/perl-5.30.0
# make;make test;make install
# cd /usr/local/perls/;rm -f /usr/local/perls/perl-5.30.0.tar.gz
# chown -R root.root /usr/local/perls
Perl installation will require about 15-20 minutes , at the end of Perl installation execute following command to install ASSP Perl modules.
Perl module installation will require other 20-25 minutes, if it returns some perl module errors you may ignore them for now. Once completed execute this
# /usr/local/cpanel/3rdparty/bin/php-cgi /usr/local/assp/deluxe/ex_localdomains.php force=yes
Ok now open cPanel WHM
Plugins Grscripts ASSP Deluxe, and click Update ASSP Perl Modules as shown below 
All Perl module should install without errors . Only if you have OS Almalinux 8.x and you receive a DB_File installation failure execute this
# yum install libdb-devel.x86_64
# yum install libdb-cxx.x86_64
# yum install libdb-cxx-devel.x86_64
# yum install libdb-devel.x86_64
# yum install libdb.i686
If you have Ubuntu OS executes this and execute again the update of ASSP Perl modules. DB_File should install without errors.
and add following rows ( later in the FAQs section you can learn what does these cronjobs )
*/59 * * * * /usr/local/cpanel/3rdparty/bin/php-cgi /usr/local/assp/deluxe/ex_localdomains.php
*/3 * * * * /usr/local/cpanel/3rdparty/bin/php-cgi /usr/local/assp/deluxe/update_email.php
*/3 * * * * /usr/local/cpanel/3rdparty/bin/php-cgi /usr/local/assp/deluxe/status.php
*/20 * * * * /usr/local/cpanel/3rdparty/bin/php-cgi /usr/local/assp/deluxe/find_abusers.php sw=29 rl=50 sc=50 dc=30 on=1
0 2 * * * /usr/local/cpanel/3rdparty/bin/php-cgi /usr/local/assp/deluxe/signatures.php
*/4 * * * * /usr/local/cpanel/3rdparty/bin/php-cgi /usr/local/assp/deluxe/spam_cronjob.php
30 1 * * * /usr/local/cpanel/3rdparty/bin/php-cgi /usr/local/assp/deluxe/clear_spambox.php
2 */6 * * * /usr/sbin/exiqgrep -o 33600 -i | /usr/bin/xargs /usr/sbin/exim -Mrm
MAILTO=root
Save cronjob list and exit.
Be sure to enter the rows MAILTO="" and MAILTO=root as shown above.
Every cron executed between MAILTO="" and MAILTO=root will not receive email cron notifications (each time the cron executes).  If you do not use MAILTO your email queue could be filled with email (email cron notification) generated by the crons above very fast !
Do not use > /dev/null since it will NOT work with these scripts.
Now execute this
Plugins Grscripts ASSP Deluxe, and click START ASSP as shown below 
ASSP should start correctly and you should be able to see its activity in ASSP log using this way
You should remember this important log /usr/local/assp/maillog.txt ; ASSP logs every incoming and outgoing email in this log . It's refreshed each 7 days automatically. A backup of your old ASSP logs are stored in /usr/local/assp. Each incoming and outgoing email has its own ASSP ID (e.g. id-83437-03814 ), the ASSP ID will be added in email headers too so you can identify an email blocked in ASSP log very easily. Email blocked will be collected in spambox while good email will be processed by EXIM and you will see them in EXIM log /var/log/exim_mainlog too.
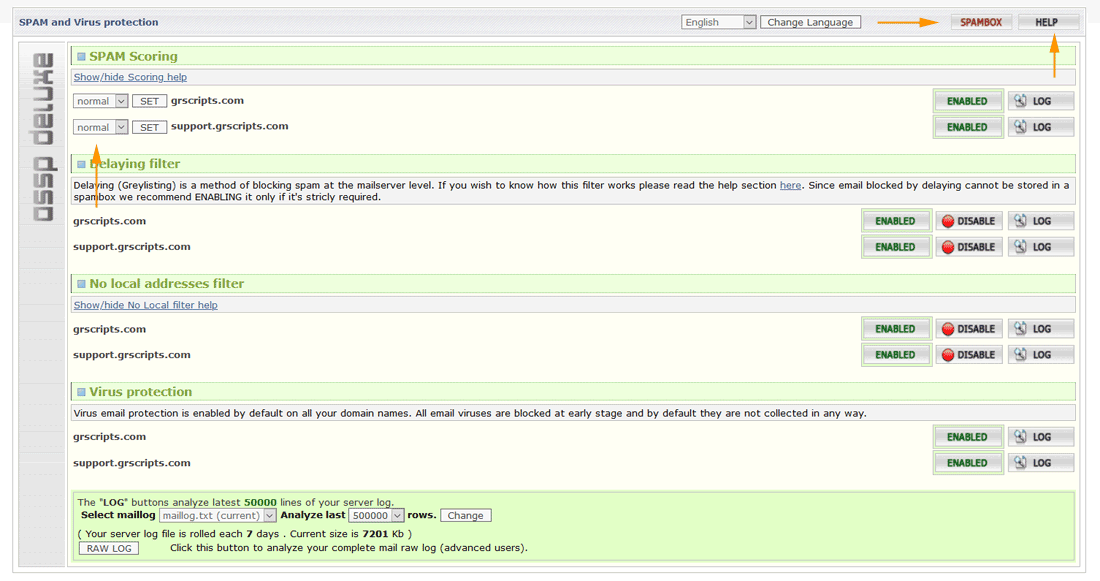
Now return to ASSP WHM INTERFACE and enable ASSP SCORING MODE as shown below

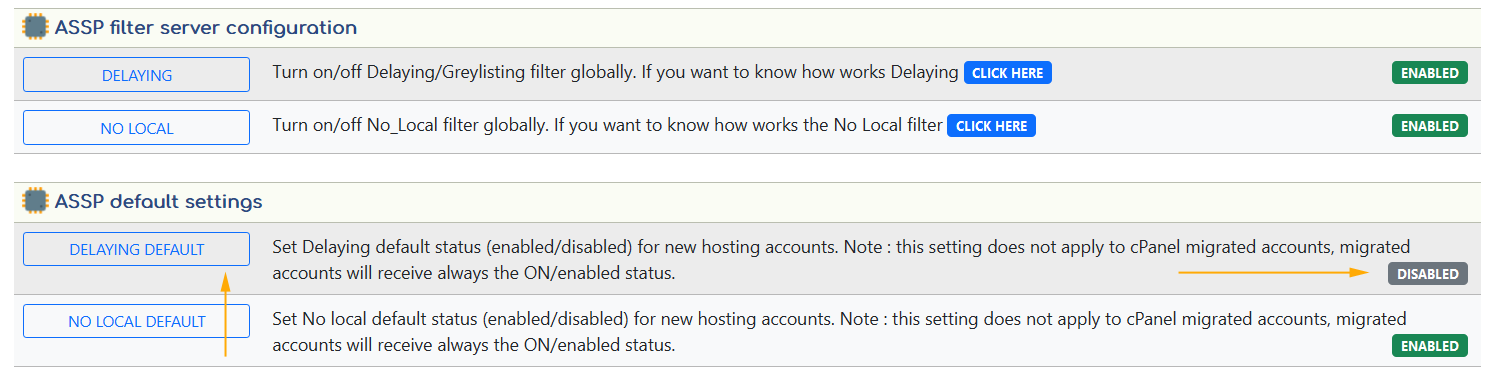
By default ASSP installation the ASSP Delaying filter starts enabled. It's recommend to set if OFF now; your user can decide to swtich it ON/OFF using their cPanel user interface.
Go to ASSP WHM INTERFACE ASSP DOMAIN CONFIG , and turn/set OFF Delaying filter for ALL your domain/users, click Submit button to save settings.
Now go to ASSP WHM INTERFACE ASSP FILTER CONFIG and press button DELAYING DEFAULT as shown below (default disabled status for new hosting accounts).
Even if the ASSP setup have to be completed (setting up ASSP SSL , SPAMBOX , an ASSP database and other some settings) your ASSP is now already running and processing email, each incoming email is filtered and proxied to EXIM. All email will be checked using multiple spam filters and a numeric score point will be added by each filter ( scoring mode ) . If the scoring Penalty limit value (PenaltyMessageLimit) will be surpassed the email will be collected as SPAM ( and tagged [ SPAM FOUND ] in ASSP log) , and you will see a 127.0.0.1 disconnection in EXIM log. If the scoring Penalty limit value will not be surpassed the email will be accepted ( and tagged [ MESSAGE OK ] in ASSP log ). Blocked email will be collected in /usr/local/assp/spam folder (and used to build the HMM and Bayesian database) and collected by the spambox spammaster email which delivers the SPAM in the imap /spambox folder of your users email (the spambox feature will be setup later in this HOW TO). Good email will be collected in /usr/local/assp/notspam folder (and used to build the HMM and Bayesian database) and proxied internally (127.0.0.1:125) to EXIM which will deliver the email in user INBOX .
Now you can install the ASSP Deluxe cPanel frontend for your users. Open the ASSP WHM INTERFACE and go down to Software Updates, and click "UPDATE FRONTEND" for "ALL themes" as shown below.

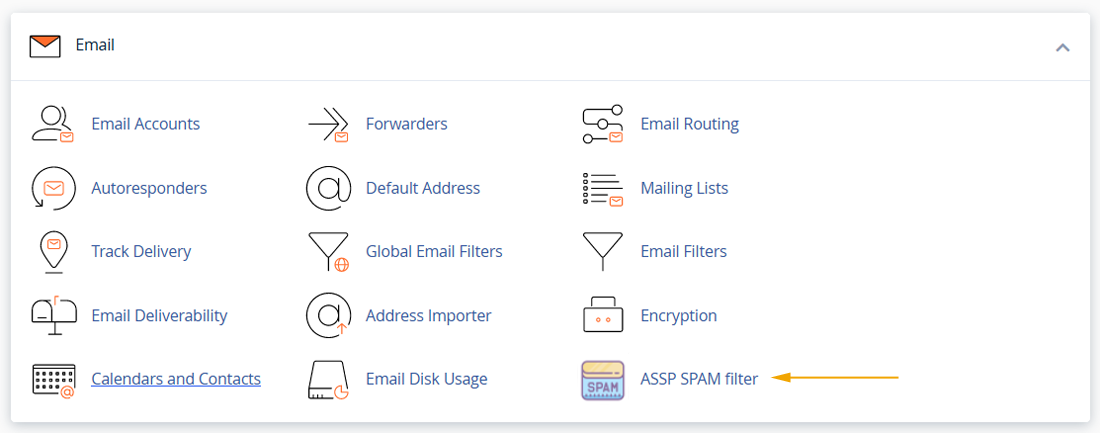
The ASSP Deluxe cPanel frontend for your users will be installed in /usr/local/cpanel/base/frontend/yourskin/asspdeluxe and you can view the user interface by pointing your browser https://www.domain.com:2083/frontend/yourskin/asspdeluxe/index.php or click the ASSP SPAM Filter icon in the EMAIL section.
ASSP Deluxe for cPanel frontend for your users
The SPAMBOX red icon shown below will appear later when the spambox feature will be installed some step below. The HELP section is very important because explains you and your users how works the ASSP spam and notspam email interface reporting . Also after pressing the SPAMBOX red button your users can configure the spambox .
 Now open ASSP WHM interface SCORE SETTINGS and set PenaltyMessageLimit to 56 , Bayesian filter to 11 and HMM filter to 43 and save settings. These values are a good choice to start your ASSP in the first days. After some week when your ASSP will build a robust HMM, Bayesian and whitelist dabatase you can reduce some point the PenaltyMessageLimit (more spam will be blocked).
 Now go to console and execute this to install Razor and DCC automatically .
# /usr/local/cpanel/3rdparty/bin/php-cgi /usr/local/assp/deluxe/razor_dcc.php

spambox requirements :
- ASSP SPAMBOX can work only with mail storage maildir . SPAMBOX imap collections is not possible using mdbox mail storage. If you want use SPAMBOX imap go to cPanel WHM
Email
Mailbox conversion and be sure all your accounts are using maildir mail storage.
note : By default your cPanel accounts should already be set to use maildir mail storage. - ASSP SPAMBOX imap cannot work if you enable IMAP email compression in cPanel WHM
Email
Mailserver configuration
. Be sure email compression is disabled/unchecked as shown below .

note : By default your cPanel accounts should already be set to with email compression disabled.
-
Open cPanel WHM
Account function
Create a new account and create a fake account spamxyz.us owned by root (not a reseller) with CGI capabilities. Set all account Options to Unlimited, and set "Enable Apache SpamAssassin™" unchecked .
If adding a new account is an issue for you (e.g. you have a WHM license with single account limit) you can install the spambox over any existent domain . In this case follow the spambox how to for your domain name instead of fake domain spamxyz.us . In each case do NOT to install the spambox over the server hostname because it will NOT work.
-
Now execute this
# echo "#spammaster@spamxyz.us: \"|/usr/local/assp/deluxe/piping_b.php\"" > /etc/valiases/spamxyz.us
-
Now execute this and replace random_password with a random password of your choice. There is no need to remember or note this password but be sure it's a strong password.
# /scripts/addpop spammaster@spamxyz.us -password random_password
- Open ASSP WHM Interface
ASSP SPAMBOX@, enter spammaster@spamxyz.us in Spammaster email , and click ENABLE SPAMBOX .
- Your ASSP spambox is installed you can return to the ASSP WHM Interface .
note : the /spambox IMAP folder will be created after the email will receive the first SPAM email message. spambox IMAP folders are cleared automatically using the clear_spambox.php cronjob , read the FAQs section for more details.
After the spambox installation you'll see new spambox features in your ASSP WHM INTERFACE which allows you to check spamboxes (SPAM FINDER) , enable/disable spambox for your users, and set spambox IMAP default status for new accounts.
Now a database should be setup for ASSP. ASSP needs to store spam and notspam keywords and whitelist, and all this data must be processed fast. By default ASSP starts with a flat txt database which is strongly NOT recommended. By using ASSP Deluxe for cPanel you can setup in few easy steps a BerkeleyDB database ( recommended ) or a MySQL database . You can choose between one of these two solutions below, BerkeleyDB or MySQL.
BerkeleyDB ASSP Setup
Open your console and execute following command which will install BerkeleyDB 5.3.28 in /usr/local/BerkeleyDB.5.3 and the BerkeleyDB Perl module for your ASSP Perl
# /usr/local/cpanel/3rdparty/bin/php-cgi /usr/local/assp/deluxe/ex_localdomains.php
Open the ASSP WHM INTERFACE and click STOP ASSP. Once ASSP is fully stopped execute this to configure ASSP to use BerkeleyDB
Open the ASSP WHM INTERFACE and click START ASSP. Your ASSP should start correctly and you should see a new menu in your ASSP WHM INTERFACE as shown below.

MySQL ASSP Setup
If you prefer to use MySQL and you did NOT enable BerkeleyDB above you can setup MySQL for your ASSP using following way.
Open the WHM cPanel SQL Services MySQL/MariaDB Upgrade
and check your current MySQL version. You should have at least MySQL 5.7 or MariaDB 10.x . If you have an older MySQL version you should upgrade it . If an upgrade is not possible it's better to use the BerkeleyDB database using the BerkeleyDB HOW TO above.
Ok now open your MySQL /etc/my.cnf configuration file using your preferred console editor and add following rows required by ASSP to avoid MySQL disconnections ( add them at the end of [mysqld] section )
wait_timeout=28800
Save the file and restart MySQL in this way
Now open the ASSP WHM INTERFACE and click MYSQL SETUP and follow simple instructions to activate MySQL.
Once MySQL has been setup return to ASSP WHM INTERFACE and you should see a new menu as shown below.

Final steps
Installation is almost complete, at this point your ASSP should be running correctly with SSL, database, spambox and preconfigured with moderate antispam settings. There are few more simple steps required to run your ASSP at the best.
Open the ASSP WHM INTERFACE , go to "ASSP 2.x core settings" and choose number of SMTP workers following the instructions. 5 is default and should be good in most cases . You can increase or reduce based on your server RAM and SMTP traffic . If you receive a lot of SMTP traffic you may consider a bigger value (8-12 e.g.). A value above 15 is not recommended. If your server has less than 8 GB RAM set to 3 max 5 workers. Remember that more workers means more SMTP processing speed, so if your users are experiencing delay to send email you should try to increase number of ASSP worker one step at time. Each time you change number of workers ASSP needs to execute a restart.

Open the ASSP WHM INTERFACE , go to "ASSP 2.x core settings" and click enable PYZOR and ANTIVIRUS CHECKS . Pyzor checks will improve antispam performance while ANTIVIRUS CHECKS permits to scan also compressed email attachments.
Pyzor requires at least Python version 2.7.5 if you have an old OS (Centos 6 e.g.) Pyzor could not work.

After enabling Pyzor and Antivirus execute this to activate immediately the new features (ASSP will be restarted to load the new feature)
Finally it's time to open the ASSP GUI to set ASSP GUI password and activate DCC and Razor plugins. Go to ASSP WHM INTERFACE and click ASSP WEB INTERFACE . Your ASSP WEB INTERFACE (GUI) should open you can login with..
nospam4me
No panic, there are countless settings here but it's everything preconfigured by ASSP Deluxe for cPanel installation; if needed you'll learn to use it day by day. You can find here ASSP core settings which are better you do not change ( for example SSL settings which are controlled using ASSP SSL MENU, database settings controlled using ASSP WHM interface, Score/Penalty Box settings , and some other core settings) and ASSP antispam settings which probably you may use often, for example the "Whitelist" menu, The "validate sender" menu, The "Perl Regular Expression Filter and Spambomb Detection" and some other. All ASSP GUI settings are saved in /usr/local/assp/assp.cfg (ASSP configuration file) . You should never edit manually this file, this file contains also crypted data , so you may risk to mess up your ASSP, always use the ASSP Web interface if you want change an ASSP setting. A backup of your configuration file /usr/local/assp/assp.cfg is saved daily in /usr/local/assp/backup_cfg , so if after doing some change in ASSP GUI your ASSP stops to work correctly , STOP your ASSP using the ASSP WHM INTERFACE , restore a working assp.cfg file from /usr/local/assp/backup_cfg to /usr/local/assp/assp.cfg and START ASSP again . You can also backup all the folder /usr/local/assp ( for example in /usr/local/assp_backup) and restore it in case your ASSP stops to working correctly after making a wrong setting in ASSP GUI or other issues.
note : there are various ASSP web interface parameters which are controlled by ASSP Deluxe for cPanel. All parameters controlled by ASSP Deluxe are listed in ASSP WHM INTERFACE AUTOMATION SETTINGS . If you are an experienced ASSP administrator and you want customize some of these parameters you should set OFF the parameter you want customize in AUTOMATION SETTINGS page.
Now, to complete the ASSP v2 setup I recommend you to take only a fast look to your ASSP GUI and to apply following final few steps. First of all your ASSP should appear like this below, you should see a green dot, which means all ASSP DBs are working correctly. If you see a red dot , close the ASSP GUI, STOP and START your ASSP using ASSP WHM INTERFACE , then open again the ASSP GUI .If the problem does not fix you should have failed the database installation some step above.

Now open the ASSP Razor Plugin menu and set DoASSP_Razor to score, then open the ASSP DCC Plugin menu and set DoASSP_DCC to score.
Now to change the default ASSP GUI password go to "General Server Setup" , go down to "Web Admin Password - Masterpassword (root) (webAdminPassword)" and set a new password. Be sure to note the new password carefully because the password will be encrypted and cannot be changed by editing the assp.cfg file.
Ok you can SAVE/APPLY ASSP settings in your ASSP GUI. You can close the ASSP WEB INTERFACE now.
Ok... ASSP v2 installation is completed and all should work correctly . All incoming email should be filtered and everything should work correctly. Now you can check the Post installation steps and FAQs page. You can learn how to STOP fully ASSP and return instantly to cPanel only , how to restart ASSP from console, and other important user and administrative tasks.